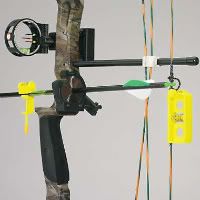
My wife was wanting to remove the finish from here camo'd Viper Quickset sight. Her new bow is a Blueberry Mathews Ignition and purple and camo just aren't a match!!
There was a little bit of slack in the fiber optic, so I just snipped the very last millimeter or two so we could remove and reuse it. Then she finished disassembling the sight and we started to work on removing the finish. As far as that goes....... After countless hours and different chemical concoctions we finally get the finish removed. Lets just say, that after trying turpentine, acetone, xylene, and even Drano we probably spent more money thatn it would have cost to just mail it off to someone to media blast it and mail it back!!! On another note if you have something that is anodized, just pour some Drano in a glass container and drop the part in and leave it for ten minutes and you have a cleaned part.
But I digress. After finally just using acetone and elbow grease and then polishing with a metal wheel and a Dremel my wife reassembles the sight. Now that the fiber optic is back in, we need to belt a small ball on the end to hold it in the pin. NO PROBLEM, I just break out the lighter and start moving it closer to the fiber jsut wanting to barely melt the end to it holds int he pin. "PUT IT OUT, PUT IT OUT!!!!!!!" Thats all I hear from my wife as the thing catches like a fuse on a firecracker!! Within half a second the thing burns down over an inch and its time to buy a new fiber. I didn't even touch it with the flame, only got to within about an inch of it.
So we talked to a couple people that sell fiber optics online. Well they pretty much just laughed at us and told us that that is most people first experience with them. HA!!! They said the best way to do it is to heat up something metal and then start to slowly move that towards the fiber till it starts to melt. Most likely won't even have to touch it. Long story short..... Talk to people that know what they are doing before you try it and it will work out for the better. What can i say, the wife was thinking of changing the color of her pin anyways!!!!!!!!
19 October 2008
16 October 2008
New posts comming soon!!!
Took a short break from shooting, and therefore tuning. Be back at it soon though. My wife and I have new bows in the mail....... Lots more tuning ahead!!!!! Look for posts on string changes, measuring strings to get new custom sets made, and complete initial bow setup tips. Plus tips on removing your anodized and dipped finishes on bows and parts.
24 September 2008
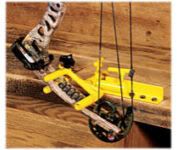
Bowmaster Portable Bow Press
I got my new bowmaster press in the mail a few days ago, and got to press my first bow with it yesterday. This is the first press I have used, and I have to say it was easy. The first bow I put it on was my daughters Martin Tiger (the older model, not the new plastic one). Her draw length was setup way too short for her by the shop, so we needed to change out mods and increase it for her. The Tiger is a solid limb bow, not split limb, so I didn't need the split limb adapters for hers. The first thing you do is place the fixed bar into the limb opening below the cam on either the top or bottom limbs. After that, you lay out the press cable and slide the other adjustable bar to the shortest length you can. Make sure that you can still slip it through the opening on the opposite limb. You will want to place something (a pair of leather scraps come with it if you purchase it new) in the crook of the limb opening to keep the cable from the press from scratching up the finish on the limbs.
Now you need to check to make sure that the cables for the press are running through it properly. It should be in the tracks for both rollers as well as the one for the press bar. If everything looks good, turn the press bar handle clockwise to take out all the slack from the cable. Before going any further you need to do a little safety check. Double check the press cable to make sure it is still in all the right tracks, and make sure that the bars are seated properly in he limbs to ensure they don't slip while pressing the bow. Once you are satisfied that everything is fine, continue turning the press bar clockwise slowly. Once your strings and cables (the ones on the bow this time) go slack enough that you could remove them from the bow STOP turning, your bow is now pressed.
Next step is to do what you needed the bow pressed for in the first place!! For me it was replacing those mods. Easiest thing in the world, remove to Allen head bolts and swap the mods out. Replace the two bolts, and viola!! Now that you are done working, make sure your bow is back in shape, and your strings and cables are routed properly. SLOWLY turn the press bar counter-clockwise to let the pressure off your bow. Keep an eye on your cables and strings the whole time to make sure they don't slip out of track. Once the cable on the press starts to go slack, back it out the rest of the way and remove the bars from the limbs. You’re done!!
I couldn't find any design flaws in this press. It worked great. You can't beat the price for your first press. It will get you started, and will last you forever even if you get a fancier stand press later on. I don't think I would ever get rid of it. I do plan on upgrading in the future, but this one will stay in my gearbox and go to the range with me, as well as in my pack when I start hunting (might even get a second one down the line so I don't have to remember to swap it around).
It is slightly more difficult to press a split limb bow, but only very slightly. You will need the adapters that span around your cam and attach at the end of the limbs. The difference being, that you slip the bars from the press into this adapter instead of through your limbs. The manual shows to different ways of setting this up depending on your cams. Also, before going past just putting tension on the press, you will want to double check the adapter to make sure it is positioned on the tips of your limbs evenly, and that it is not going to rub cams or cables. You will need to play around with this a bit from bow to bow to get the right fit, but once you have it, the process is as simple as before.
I got the whole setup (press and split limb adapters) for $35 dollars used, a great deal. You can get them new for $40 for the press, and $14 for the adapters. They even sell a leather carry pouch for the press for $13.
15 September 2008
What does THAT mean??
OK folks, I figured a vocabulary lesson was in order. If you are new to archery, some of the terms used might as well be Greek. Here is a quick list to get you started with.
Arrow shelf
ASA
ATA
Bare shaft
Bow square
Bow string
Brace height
Cable guard
Cam
Center shot
D-Loop
Draw length
Draw weight
Fistmele
IBO
Let-Off
Limb
Nocking Point
Peep sight
Release aid
Rest
Riser
Serving
Serving jig
Sight
Stabilizer
Arrow shelf
- The area of the bow above the handle or grip where the arrow sits.
ASA
- Archery Shooters Association
ATA
- Axle to Axle, the distance from the center of one axle of your bow to the other
Bare shaft
- A arrow shaft without fletching, nocks, inserts, points, paint, or cresting.
Bow square
- Tool that is T-shaped used to determine where to place string nock, measure brace height, and tiller.
Bow string
- Several strands of material twisted together to form a strong string used to launch an arrow.
Brace height
- The distance from the string to the deepest part of the handle or grip. This distance can be changed by twisting the string tighter to increase the height and untwisting it to decrease the height.
Cable guard
- The rod on compound bows which keeps the cables away from the center of the bow so the arrow can pass by without hitting the cables.
Cam
- The wheel or pulley on the end of compound bow's limb used to provide let-off and power. They may be round or elliptical shape.
Center shot
- A bow with a sight window that is inset to the centerline that runs along the bow from end to end inline with the string. This lessens the bending of the arrow when released.
D-Loop
- A string in a U shape tied on the bow string around the nock point that a release aid is attached to when shooting.
Draw length
- The distance a person draws a bow, measured from the bottom of the arrow nock to the back of a bow when in shooting position.
Draw weight
- Amount of pull weight measured in pounds that it takes to pull a bow string a certain distance.
Fistmele
- Another term for Brace Height.
IBO
- International Bowhunting Organization
Let-Off
- The percent that a bows holding weight is reduced from its pulling weight when the cams are in the valley.
Limb
- The ends of the bow that bend when the string is pulled back.
Nocking Point
- A mark put on bow string to mark where to nock the arrow. Sometimes a simple knot in a string is used, sometimes the point is marked with a brass clip with a rubber insert to protect the string. A loop of string or a loop of metal may be used with a release aid for the string nock.
Peep sight
- The rear sight of a bow. A piece of metal, plastic, or rubber with a hole in it placed in the string, that allows the shooter to look through the string.
Release aid
- Some type of tool that is used to pull the bow string and provide a better release by a trigger of some type.
Rest
- Holds the forward part of the arrow when drawing the bow.
Riser
- The middle part of a bow that has the grip, shelf, sight window and other parts. This part of the bow does not bend when pulling the string.
Serving
- String material applied to the bow string to in the nock area to make the string last longer and used also to make a loop in the string ends. Serving is also used to keep the peep site from moving on the string.
Serving jig
- A tool used to apply serving string to bowstrings and cables.
Sight
- Aiming device, generally with one or more fiber optic pins
Stabilizer
- A weight rod of various lengths and weights that is attached to a bow to reduce vibrations and supposedly give better control of grouping of shots.
Tools of the Trade
So, what does it take to set up shop? Not as much as you would think, but there are some must haves. First and foremost among them is a space to work. Don't get me wrong, it's not like you need a large dedicated shop, or even a dedicated corner for that matter. Your space can be as simple as your coffee table or kitchen table. A big word of advice though, get a small folding table to use instead. Nothing will hinder relations with your significant other faster than ruining said coffee or kitchen table!!! It doesn't need to be big, just somewhere to lay out your bow and tools. If you do have to set up on the furniture, lay out an old towel for a work surface, it will keep your bow from getting scratched as well. Now that you have a work area, on to the tools.
Bow Press
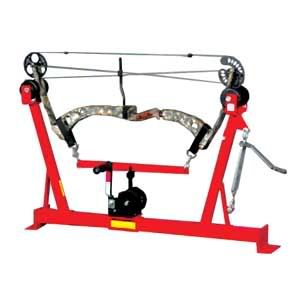
There are lots of options here. You can go portable with something like the Bowmaster, or get a full blown shop style setup with the Apple Press and stand. There are tons of options in prices ranging from ~$40 all the way into the thousands. The most important thing is to make sure it will work for your bow. Some presses will not work for split limb bows without an adapter that you will have to buy. Some will not press parallel limb bows without being modified. The difference here is in the way the limbs flex on a parallel vs. non-parallel bow. Parallel limbs flex vertically when the bow is drawn due to the fact that they are essentially in a horizontal plane. Non-parallel limbs will flex somewhere between vertical and horizontal, roughly at an angle towards the nock of the string. Due to this difference, if you try and press a parallel limb on a press not designed for it, it will not press fully and could damage the bow. Same applies to the non-parallel limb on a parallel press.
Presses are used for many things. Anytime you need to modify anything attached to the string, you will need to press it so that you can separate the strands of the string to get the accessories in between them. You need it to adjust cam timing (the rotation of the cams) or change draw length mods. Also for when it comes time to change out aging strings and cables, or repair damaged ones. You shouldn't need it that often, but when you do need it there is no substitute.
Examples....
Bow Vise
A simple device for holding your bow. It can be pretty hard to work on a bow unless you have a third arm!! That's where the vise comes in. A simple one will hold your bow in one position allowing you to work on your bow. A better one will allow you to rotate the bow in many directions once it is mounted. This will allow you to get the bow in just the right position for the work you need to do.
Example....
Allen Wrenches
or hex keys, whatever you want to call them. You know what these things are. You will need multiple sizes. A decent standard set from any hardware store will do. I have never run across any metric, yet. It couldn't hurt, though, to have a set of those just in case.
Screwdrivers
You won't need them all that often, but you will need them. Have a simple set of common and philips on hand.
Levels
Not your daddy's variety. A string level, and an arrow level.
These will help you in setting up your rest. Place the string level, where else.... on the string!!! Use it to make sure your bow is level vertically (up and down for those that always get them mixed up) when in the vise. Now you place the arrow level on the arrow and adjust your rest until your arrow is perfectly horizontal.
Nock Set Pliers and Brass Nocks
Brass nocks are useful for many things. You can use them to attach your drop away rest cord to your cable. Place them above and below a kisser button to secure it in place. And of course even use them to mark your nock point.

Nock set pliers, obviously, are for attaching those little brass guys. A good pair will also have a lever to pry them off with.
Draw Length Arrow

Basically a long, unfletched arrow with markings toward the end. These markings are distance measurements that allow for checking draw length. It can be used for Three functions. First, draw it back with a recurve bow, or compound with no draw stop, and you can find your draw length (someone needs to help you here to make sure your form is right, otherwise you won't get the correct draw length). Second, Draw it in your set up compound bow to check the draw length it is set at. Lastly, draw it in the same bow and use it to determine the arrow length that will be safe to use with your setup.
Draw Weight Scale
Many different varieties are available. Simple ones like this that are hand held...
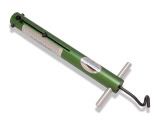
All the way up to digital versions, or ones that are mounted to the ceiling. They are handy if you want to know the exact weight you have your bow set to. However, not all that necessary. Example... Lets say your bow maxes out at 60#, and the company says you can adjust the draw weight by 2# per full turn of the limb bolts. Then you know that if you back the bolts out 3 turns each, then you just roughly set your bow to 54#. I don't think it is all that important to know that it might actually be 53.2#, or 55#. If you know within a pound I would say your are good. Just get those numbers from your bows manufacturer.
D-Loop Pliers
Last thing you want while our hunting, or anytime for that matter, is for your bow to fail. If you don't tighten your d-loop tight enough it is a sure fire failure point waiting to happen. The easiest way to tighten it is with a pair of d-loop pliers. These are specially made pliers designed to fit around a d-loop. Then when you squeeze the handle, instead of the two pieces closing tightly together, they spread. The formed head holds the knot ends in place while stretching out the loop and tightening the knots.
Example....

Well, that pretty well covers the most common tools you will need and see when it comes to setting up and maintaining your bow. I tried to be as comprehensive as I could, but there are quite a few gadgets out there, and I aim to cover all I can. Those will have to wait for another day however, so stay tuned for more. I'm going high tech in the next installment.
Bow Press
There are lots of options here. You can go portable with something like the Bowmaster, or get a full blown shop style setup with the Apple Press and stand. There are tons of options in prices ranging from ~$40 all the way into the thousands. The most important thing is to make sure it will work for your bow. Some presses will not work for split limb bows without an adapter that you will have to buy. Some will not press parallel limb bows without being modified. The difference here is in the way the limbs flex on a parallel vs. non-parallel bow. Parallel limbs flex vertically when the bow is drawn due to the fact that they are essentially in a horizontal plane. Non-parallel limbs will flex somewhere between vertical and horizontal, roughly at an angle towards the nock of the string. Due to this difference, if you try and press a parallel limb on a press not designed for it, it will not press fully and could damage the bow. Same applies to the non-parallel limb on a parallel press.
Presses are used for many things. Anytime you need to modify anything attached to the string, you will need to press it so that you can separate the strands of the string to get the accessories in between them. You need it to adjust cam timing (the rotation of the cams) or change draw length mods. Also for when it comes time to change out aging strings and cables, or repair damaged ones. You shouldn't need it that often, but when you do need it there is no substitute.
Examples....
Bow Vise
A simple device for holding your bow. It can be pretty hard to work on a bow unless you have a third arm!! That's where the vise comes in. A simple one will hold your bow in one position allowing you to work on your bow. A better one will allow you to rotate the bow in many directions once it is mounted. This will allow you to get the bow in just the right position for the work you need to do.
Example....
Allen Wrenches
or hex keys, whatever you want to call them. You know what these things are. You will need multiple sizes. A decent standard set from any hardware store will do. I have never run across any metric, yet. It couldn't hurt, though, to have a set of those just in case.
Screwdrivers
You won't need them all that often, but you will need them. Have a simple set of common and philips on hand.
Levels
Not your daddy's variety. A string level, and an arrow level.
These will help you in setting up your rest. Place the string level, where else.... on the string!!! Use it to make sure your bow is level vertically (up and down for those that always get them mixed up) when in the vise. Now you place the arrow level on the arrow and adjust your rest until your arrow is perfectly horizontal.
Nock Set Pliers and Brass Nocks
Brass nocks are useful for many things. You can use them to attach your drop away rest cord to your cable. Place them above and below a kisser button to secure it in place. And of course even use them to mark your nock point.
Nock set pliers, obviously, are for attaching those little brass guys. A good pair will also have a lever to pry them off with.
Draw Length Arrow
Basically a long, unfletched arrow with markings toward the end. These markings are distance measurements that allow for checking draw length. It can be used for Three functions. First, draw it back with a recurve bow, or compound with no draw stop, and you can find your draw length (someone needs to help you here to make sure your form is right, otherwise you won't get the correct draw length). Second, Draw it in your set up compound bow to check the draw length it is set at. Lastly, draw it in the same bow and use it to determine the arrow length that will be safe to use with your setup.
Draw Weight Scale
Many different varieties are available. Simple ones like this that are hand held...
All the way up to digital versions, or ones that are mounted to the ceiling. They are handy if you want to know the exact weight you have your bow set to. However, not all that necessary. Example... Lets say your bow maxes out at 60#, and the company says you can adjust the draw weight by 2# per full turn of the limb bolts. Then you know that if you back the bolts out 3 turns each, then you just roughly set your bow to 54#. I don't think it is all that important to know that it might actually be 53.2#, or 55#. If you know within a pound I would say your are good. Just get those numbers from your bows manufacturer.
D-Loop Pliers
Last thing you want while our hunting, or anytime for that matter, is for your bow to fail. If you don't tighten your d-loop tight enough it is a sure fire failure point waiting to happen. The easiest way to tighten it is with a pair of d-loop pliers. These are specially made pliers designed to fit around a d-loop. Then when you squeeze the handle, instead of the two pieces closing tightly together, they spread. The formed head holds the knot ends in place while stretching out the loop and tightening the knots.
Example....
Well, that pretty well covers the most common tools you will need and see when it comes to setting up and maintaining your bow. I tried to be as comprehensive as I could, but there are quite a few gadgets out there, and I aim to cover all I can. Those will have to wait for another day however, so stay tuned for more. I'm going high tech in the next installment.
13 September 2008
Sight Physics
We were out at the range today trying to sight in our new Viper Quickset sights (a single pin sight with a slider for yardage adjustments). My wife was having trouble getting hers set. She got it pretty well sighted in, but...... Her sight was set almost as low as we could make it. The way it was she would barely be able to shoot out to 30 yards, and no way she could reach 40. By the way, she shoots a Hoyt Selena set to 42#, 25". There was a little bit of adjustment left in the actual sight mount, so we moved it all the way down to give her more adjustment with the slider.
So, we did that, then we set the slider back at the bottom (puts the sight as high as it can go), and tried again. She still nearly put it in the dirt. Played a little more, and got the same results as before. Still no way she could shoot the 40 yard target. Now we are both getting really frustrated. I start rethinking what we are doing, but we are doing it right. The higher the sight pin, the lower your arrow will hit. Finite and hard set rule. Finally it dawns on us! Why not just have her change her anchor, and move the peep up? By moving the peep up and lowering the anchor, you effectively move your entire bow down. With the bow moved down, you have to angle the bow up to see the sight pin if it was left in the same place. Therefore, you hit higher on the target. OR, you can do what we had been trying to do all along, move your sight up!! We didn't move the peep yet, but we moved her anchor and she shot a few. Now her sight is almost at the top part of the slide when she shoots the 20 yard target, giving her plenty of adjustment to allow her to hit the 50 yard easily, and maybe even he 60. She is trying to decide whether she wants to use the peep anymore, or work on using a kisser and just feeling out the consistent anchor. But that's a discussion for another day.
So, we did that, then we set the slider back at the bottom (puts the sight as high as it can go), and tried again. She still nearly put it in the dirt. Played a little more, and got the same results as before. Still no way she could shoot the 40 yard target. Now we are both getting really frustrated. I start rethinking what we are doing, but we are doing it right. The higher the sight pin, the lower your arrow will hit. Finite and hard set rule. Finally it dawns on us! Why not just have her change her anchor, and move the peep up? By moving the peep up and lowering the anchor, you effectively move your entire bow down. With the bow moved down, you have to angle the bow up to see the sight pin if it was left in the same place. Therefore, you hit higher on the target. OR, you can do what we had been trying to do all along, move your sight up!! We didn't move the peep yet, but we moved her anchor and she shot a few. Now her sight is almost at the top part of the slide when she shoots the 20 yard target, giving her plenty of adjustment to allow her to hit the 50 yard easily, and maybe even he 60. She is trying to decide whether she wants to use the peep anymore, or work on using a kisser and just feeling out the consistent anchor. But that's a discussion for another day.
11 September 2008
A little about me
Born and raised in Texas, I have always loved the outdoors. There's just something about walking under the open sky with not a sign of civilization in sight that sets the mind at ease. It allows you to think and unwind. I think it started when I was a young boy. I stayed with my grandparents while my mom worked. We would spend most of the time on the road going from campground to campground all over the state. Although it was in a camper, and not under the stars, I spent most of that time exploring. I was hardly ever at the trailer, instead I was wandering through the trees or swimming in the lakes and streams. I also spent countless hours on the piers standing next to my grandfather with pole in hand. Rarely did we catch dinner, in fact I remember more weeds, and even an old thermos, on my line than fish. It was that time spent that mattered though, not the end result. I have tried many hobbies in the outdoors, and I can't say there was one that I did not enjoy. I also find myself extremely lucky to have ended up with a wife who enjoys everything about nature that I do.
Archery is my latest endeavor, although this is not the first time that I have tried it. When I was a young teenager I would spend time in the Texas hill country with my cousin hunting. One trip he had borrowed his neighbors bow and we decided to give it a shot. In hindsight, seeing that the bow had a 29" draw length and was 60lb draw, maybe it wasn't the best idea. Did I mention that his neighbor was 28 and well built?!? Anyway, we went out for the day with hopes of spotting some hogs. We finally did spot a group around mid day. Needless to say, the bow was a bit much for us to handle, and all we succeeded in doing was making the pigs angry. Those pigs may be small, but when they get in a group, they won't hesitate to tree you like a scared raccoon. Thus ended my first, and very brief, stint with archery.
Today, I enjoy shooting with my wife and 3 kids. Although new to the sport, I see it as something that I will continue to enjoy for many years to come. I can only hope that my kids continue to enjoy it as well. I look forward to the day that they can pull enough weight to truly go out and hunt with them. In the meantime, the hours spent at the range are a great outing. Watching them learn and improve is a great joy for any parent.
Subscribe to:
Posts (Atom)